
Sunday, May 31, 2009
Monday, May 25, 2009

Sunday, May 24, 2009


Saturday, May 23, 2009

Friday, May 22, 2009

Thursday, May 21, 2009


Monday, May 18, 2009

Wednesday, May 13, 2009

Friday, May 08, 2009
How To Draw Deadpool
I will use the Rob Liefeld version of Deadpool. I love this version the most because of its simplicity, plus it's the original version, I consider this the de facto version of Deadpool or the base design for the character.
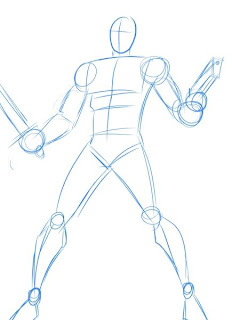
1.) First, draw some shapes to make the basic human figure. It's entirely up to you how you want him to pose.
2.) Add some Deadpool-like details to the basic shapes.
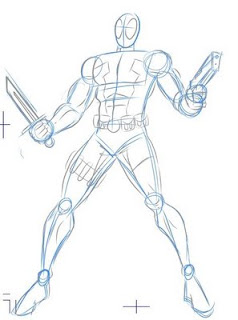
3.) You may add more details but since I'm the one who's inking this piece-- this is enough detail for me to go on. I use the pencil details to render the basic lines.
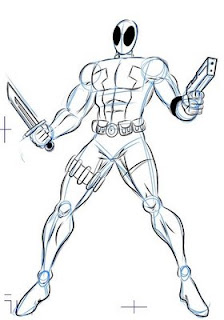
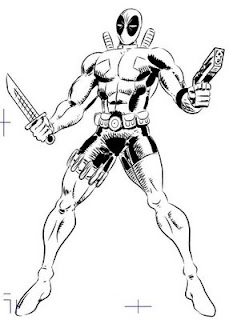
4.) Then I would proceed with more details. I add the shadows and feathering. And, since this is the Rob Liefeld or 90's version of the character, I would put a lot of cross-hatching XD!
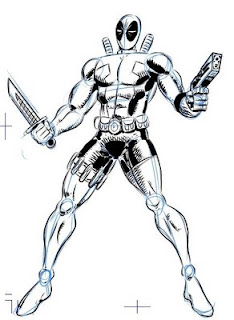
5.) Erase the pencil lines... and voila!!! 90's Deadpool!!!
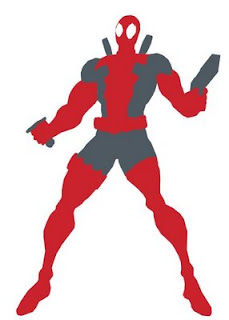
6.) This is not enough for me. I like my characters in 4-colour glory. So I would use my handy dandy Adobe Photoshop to render the character... I would start with basic flatting.
7.) This is what the flattened RGB channel would look like.
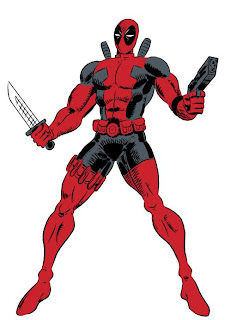
8.) Then I would proceed to airbrush the piece, adding shadows and highlights to give it volume. Below is the finished product! TA-DAH!
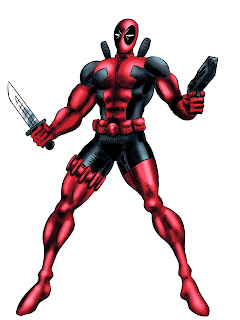
9.) Here's the RGB channel for the color if you're interested.

Watch out for my next tutorial. I haven't figured out what to do next. You may post request for character's you'd like me to use. Hmmm... I'm thinking Lone Wolf (the classic Timberwolf from the Legion of Super-Heroes) but then again something else might pop into my head. I also would like to show my process for creating sequentials out of prose fan fiction. Ok, that's it for now!
Excelsheet!
Joe
1.) First, draw some shapes to make the basic human figure. It's entirely up to you how you want him to pose.

2.) Add some Deadpool-like details to the basic shapes.

3.) You may add more details but since I'm the one who's inking this piece-- this is enough detail for me to go on. I use the pencil details to render the basic lines.

4.) Then I would proceed with more details. I add the shadows and feathering. And, since this is the Rob Liefeld or 90's version of the character, I would put a lot of cross-hatching XD!

5.) Erase the pencil lines... and voila!!! 90's Deadpool!!!

6.) This is not enough for me. I like my characters in 4-colour glory. So I would use my handy dandy Adobe Photoshop to render the character... I would start with basic flatting.

7.) This is what the flattened RGB channel would look like.

8.) Then I would proceed to airbrush the piece, adding shadows and highlights to give it volume. Below is the finished product! TA-DAH!

9.) Here's the RGB channel for the color if you're interested.

Watch out for my next tutorial. I haven't figured out what to do next. You may post request for character's you'd like me to use. Hmmm... I'm thinking Lone Wolf (the classic Timberwolf from the Legion of Super-Heroes) but then again something else might pop into my head. I also would like to show my process for creating sequentials out of prose fan fiction. Ok, that's it for now!
Excelsheet!
Joe
Wednesday, May 06, 2009


Subscribe to:
Posts (Atom)